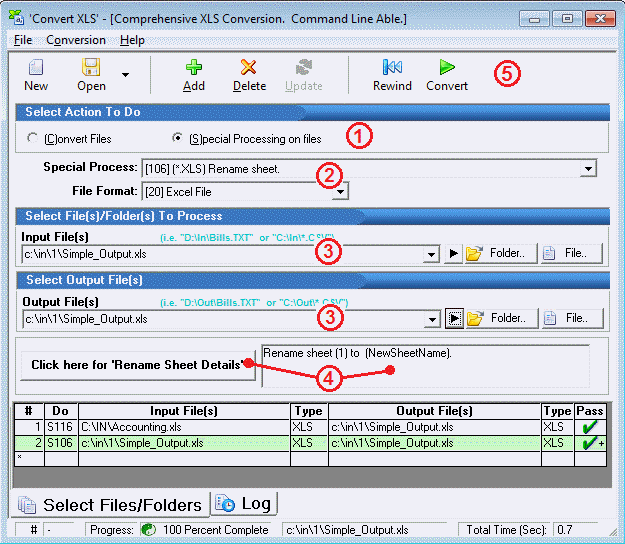
If you need something other than a simple conversion done you've come to the right place. Special processes include these general categories:

For every special process conversion job, you will need to take the following steps:
(1) If not already chosen, select Special Processing on Files as the action to do.
(2) Select the Special Process. Select the File Format of the input files(s).
(3) Select
the input and output file(s) to be processed from the "![]() File" or "
File" or "![]() Folder" buttons. You
may use wildcards (? or *) for multiple file processing.
For the output you may specify Date/Time fields.
Folder" buttons. You
may use wildcards (? or *) for multiple file processing.
For the output you may specify Date/Time fields.
(4) Click the Click here for Options button at this time to specify additional items associated with the special process chosen. Note that the button caption changes for each special process chosen.
(5) Optional: If you are going to specify more than one special process or conversion item, press the Add button on the tool bar to add the task to the 'Conversion Task List'.
Press the Convert (or F5) button to begin the 'Conversion Job'.
Repeat Steps 1- 4 as needed to add more tasks to the 'conversion job'. Conversion jobs can be saved, restored, and edited; they may also be run from the command line and built in scheduler. See the File menu to save or restore a conversion job.
Processing whole folders
Use the wildcard syntax to specify a whole folder to process. For example to process all the XLS files in the c:\IN\ folder you would specify c:\IN\*.XLS.
![]() The
Quick Launch Buttons
The
Quick Launch Buttons
Quick launch buttons are extremely helpful. They are located immediately to the right of the input and output file specification area. When they are clicked they will open the files specified in their default editor. If a folder of files is specified the quick launch button will open Windows Explorer using that specific folder for your review. Use these buttons to instantly check the content of the input and output file/folders before or after conversions.
Modifying items in the task list
If you would like to make changes to an existing conversion item in the conversion task list, highlight that entry by clicking on it (double click for Options associated with the item). The details associated with the item will be displayed in the upper portion of the user interface. Make whatever changes are necessary then click the Update (or ALT-U) button in order to save those changes.
A task may be moved within the conversion task list. Doing so allows you to easily re-sequence the tasks within the job. Select the Conversion menu item or the RIGHT MOUSE CLICK to open a pop-up menu item as shown below. CTRL-U and CTRL-D will also move a conversion item up and down respectively.

Right mouse clicking over a conversion item displays the menu shown above.
Using non-standard file extensions
In all cases you will have to specify the File Format..
See also:
Quick Start - How to Convert Files
Quick Start - Special Processing on Files